Shaving is a daily ritual that bridges the gap between self-care and grooming. At the heart of this ritual lies the essential tool known as shaving cream. This seemingly humble product plays a crucial role in achieving a smooth, comfortable, and irritation-free shave. In this exploration of shaving cream, we delve into its history, composition, types, application techniques, and its significance in modern grooming.
A Historical Glimpse
The practice of shaving dates back centuries, with various cultures employing different methods and substances to enhance the shaving experience. Ancient Egyptians, for example, used a mixture of animal fat and wood alkali to create a rudimentary shaving cream. However, the modern concept of shaving cream as we know it today began to take shape in the 19th century.
The earliest commercial shaving creams were introduced in the mid-1800s and were often available in solid or semi-solid forms. These early versions were primarily made from a combination of soap and water, with some formulations incorporating natural oils and fragrances. The evolution of technology and chemistry over the decades led to the development of more sophisticated and effective shaving creams that catered to specific skin types and preferences.
Composition and Formulations
Modern shaving creams are formulated to provide a luxurious and comfortable shaving experience. They consist of a blend of ingredients carefully chosen to create a rich lather, soften facial hair, and lubricate the skin. The primary components of shaving cream include:
Water: Water serves as the base of most shaving creams, providing the necessary fluidity for the product to be easily applied to the skin.
Soap: Soap, usually in the form of potassium or sodium salts of fatty acids, acts as a surfactant that breaks down oils and dirt, allowing for a thorough cleanse of the skin and hair.
Emollients and Oils: Natural oils, such as coconut oil, jojoba oil, and glycerin, are commonly added to shaving creams to moisturize and soften the skin and hair, reducing the friction caused by the razor.
Fragrance: Essential oils and synthetic fragrances are often included to enhance the sensory experience of shaving. These scents can range from traditional, woody aromas to more contemporary, citrusy notes.
Humectants: Ingredients like glycerin help retain moisture on the skin's surface, preventing excessive drying during the shaving process.
Stabilizers and Thickeners: These additives maintain the consistency of the shaving cream, allowing it to be easily whipped into a lather.
Types of Shaving Cream
Shaving creams come in a variety of formulations, each catering to different skin types, preferences, and techniques. The main types include:
Traditional Shaving Cream: These are often found in tubs or tubes and require the use of a shaving brush to create a lather. Traditional shaving creams offer a classic, nostalgic experience and are favored by wet shaving enthusiasts.
Brushless Shaving Cream: Also known as shaving gels or foams, these products do not require a brush for lathering. They are dispensed as a gel or foam and are particularly convenient for those seeking a quick and fuss-free shave.
Shaving Soap: While not exactly a cream, shaving soaps are Saponificio Varesino solid formulations that require a brush to create a lather. They often have a more traditional feel and can provide a rich, dense lather.
Cream-to-Foam Shaving Cream: These products start as a cream and transform into a rich foam when applied to the skin. They offer a compromise between the traditional and brushless options.
Application Techniques
Achieving the perfect lather is key to a comfortable and close shave. Whether using a traditional shaving cream, brushless gel, or shaving soap, the following techniques can help create an optimal lather:
Traditional Shaving Cream with a Brush: Wet the brush with warm water, then swirl it in the shaving cream until a rich lather forms. Apply the lather to the face using circular motions, ensuring an even distribution.
Brushless Shaving Cream or Gel: Dispense a small amount of the product onto wet hands. Rub the product between your palms to create a lather, then apply it to the face.
Shaving Soap with a Brush: Wet the brush and then use circular motions to load the brush with soap. Transfer the loaded brush to a shaving bowl or directly to the face, then whip the lather into a rich foam.
Cream-to-Foam Shaving Cream: Apply a small amount of the cream to a wet face and massage it in. The product will transform into a lather as you work it.
Significance in Modern Grooming
In the era of multi-blade razors and electric shavers, the role of shaving cream might seem diminished. However, its importance in modern grooming cannot be overstated. Here are some reasons why shaving cream remains an integral part of the shaving process:
Protection and Lubrication: Shaving cream creates a protective barrier between the razor and the skin, minimizing friction and reducing the risk of nicks, cuts, and irritation.
Softening Facial Hair: The emollients and oils in shaving cream help to soften the hair, making it easier to cut and reducing the force required during shaving.
Moisturization: The moisturizing properties of shaving cream prevent the skin from drying out during the shaving process, leaving it feeling soft and supple.
Enhanced Sensorial Experience: The scents and textures of shaving creams add a sensory dimension to the shaving ritual, transforming it from a routine task into a moment of self-indulgence.
Preparation for Shaving: The act of applying shaving cream serves as a preparatory step, opening up the pores and lifting the hair follicles, resulting in a more effective and comfortable shave.
Conclusion
Shaving cream, with its rich history, diverse formulations, and multifaceted benefits, remains an essential component of the shaving ritual. Whether one prefers the traditional experience of using a brush and soap or the convenience of brushless gels, the act of lathering up with shaving cream continues to bridge the gap between personal care and grooming. In a world where efficiency often trumps tradition, the enduring significance of shaving cream as a tool for achieving a close, comfortable, and enjoyable shave reminds us that the simple acts of self-care can be imbued with meaning and satisfaction.
5 Easy Facts About CBD et troubles neurologiques Described
The beauty and skincare industry is constantly evolving, with new ingredients and formulations entering the market regularly. One such ingredient that has gained significant popularity in recent years is cannabidiol, commonly known as CBD. CBD, derived from the cannabis plant, has shown promising potential in skincare and cosmetics due to its various properties. In this comprehensive guide, we will explore the world of CBD-infused cosmetics, discussing what CBD is, its benefits, and how it is used in skincare products. Whether you're a skincare enthusiast or a beauty professional, this guide will provide you with valuable insights into the exciting realm of CBD and cosmetics.
Understanding CBD
CBD, or cannabidiol, is one of the many compounds found in the cannabis plant. Unlike its counterpart, tetrahydrocannabinol (THC), CBD does not possess psychoactive properties. It is extracted from hemp plants, which are cultivated specifically for high CBD content and low THC levels. CBD interacts with the body's endocannabinoid system, a complex network of receptors responsible for maintaining balance and homeostasis.
CBD is known for its potential therapeutic benefits, which include anti-inflammatory, antioxidant, and soothing properties. These properties make CBD an ideal ingredient for skincare products, as it can potentially alleviate skin concerns such as redness, irritation, and inflammation. Additionally, CBD has been studied for its potential to regulate sebum production, making it a viable option for those with oily or acne-prone skin.
Benefits of CBD in Cosmetics
One of the key benefits of CBD in cosmetics is its anti-inflammatory properties. Inflammation is a common underlying factor in various skin conditions, including acne, eczema, and psoriasis. CBD can potentially help reduce inflammation and redness, providing relief and a calmer complexion for those with sensitive or problematic skin.
CBD is also a potent antioxidant, meaning it helps protect the skin from free radicals and environmental stressors. Free radicals are unstable molecules that can damage the skin's cells, leading to premature aging and dullness. By neutralizing these free radicals, CBD can potentially promote healthier, more youthful-looking skin.
Another advantage of CBD in cosmetics is its potential to soothe and hydrate the skin. CBD-infused products often contain moisturizing agents that help lock in hydration and prevent water loss from the skin. This can be beneficial for individuals with dry or dehydrated skin, as CBD can help restore the skin's moisture barrier and improve overall hydration levels.
CBD in Skincare Products
CBD can be found in a wide range of skincare products, including creams, serums, oils, masks, and cleansers. These products are formulated to harness the potential benefits of CBD and deliver them directly to the skin. When selecting CBD-infused skincare products, it is important to consider the quality and concentration of CBD, as well as the other ingredients included in the formulation.
One of the most popular CBD skincare products is CBD oil. CBD oil is typically derived from hemp plants and is rich in CBD and other beneficial compounds. It can be applied directly to the skin or mixed with other skincare products for added benefits. CBD oil is known for its versatility and can be used for targeted treatments or as a part of a daily skincare routine.
CBD-infused face masks have also gained popularity in recent years. These masks combine the soothing properties of CBD with other skin-loving ingredients to provide a luxurious and rejuvenating experience. CBD face masks are often used to hydrate the skin, reduce redness and inflammation, and promote a radiant complexion.
How to Choose CBD-infused CBD et chevaux Cosmetics
When choosing CBD-infused cosmetics, there are several factors to consider. First and foremost, it is crucial to select products from reputable brands that prioritize quality and transparency. Look for brands that provide third-party lab testing results to ensure the potency and purity of their CBD extracts.
Pay attention to the concentration of CBD in the product. Higher concentrations may provide more pronounced effects, but it is advisable to start with lower concentrations if you are new to CBD skincare. Additionally, consider the other ingredients in the product and their compatibility with your skin type and concerns.
It is also worth noting that CBD-infused cosmetics are not a one-size-fits-all solution. Each individual's skin is unique, and what works for one person may not work for another. It may require some trial and error to find the right CBD-infused products that suit your specific needs.
Conclusion:
CBD has undoubtedly made its mark in the cosmetics industry, offering potential benefits for the skin and overall well-being. With its anti-inflammatory, antioxidant, and hydrating properties, CBD has become a sought-after ingredient in skincare products. Whether you're looking to address specific skin concerns or simply enhance your skincare routine, CBD-infused cosmetics can be a valuable addition. Remember to choose products from reputable brands, consider the concentration of CBD, and pay attention to your skin's individual needs. Embrace the power of CBD and unlock the potential for healthier, more radiant skin.
Laser Eye Color Change Surgery: Introducing A World to Eye Color Change!
With noninvasive laser surgery, it is possible to change the color of the eyes. Turkey is the best place for cosmetic laser iridoplasty surgery.
B2C Consulting in Istanbul is a leading laser eye color change surgery provider using cosmetic laser iridoplasty. Their team of experienced ophthalmologists provides effective procedures to change eye color, offering the latest in laser eye color change procedures. They are known to use advanced laser technology on the market safely, efficiently, and predictable manner.
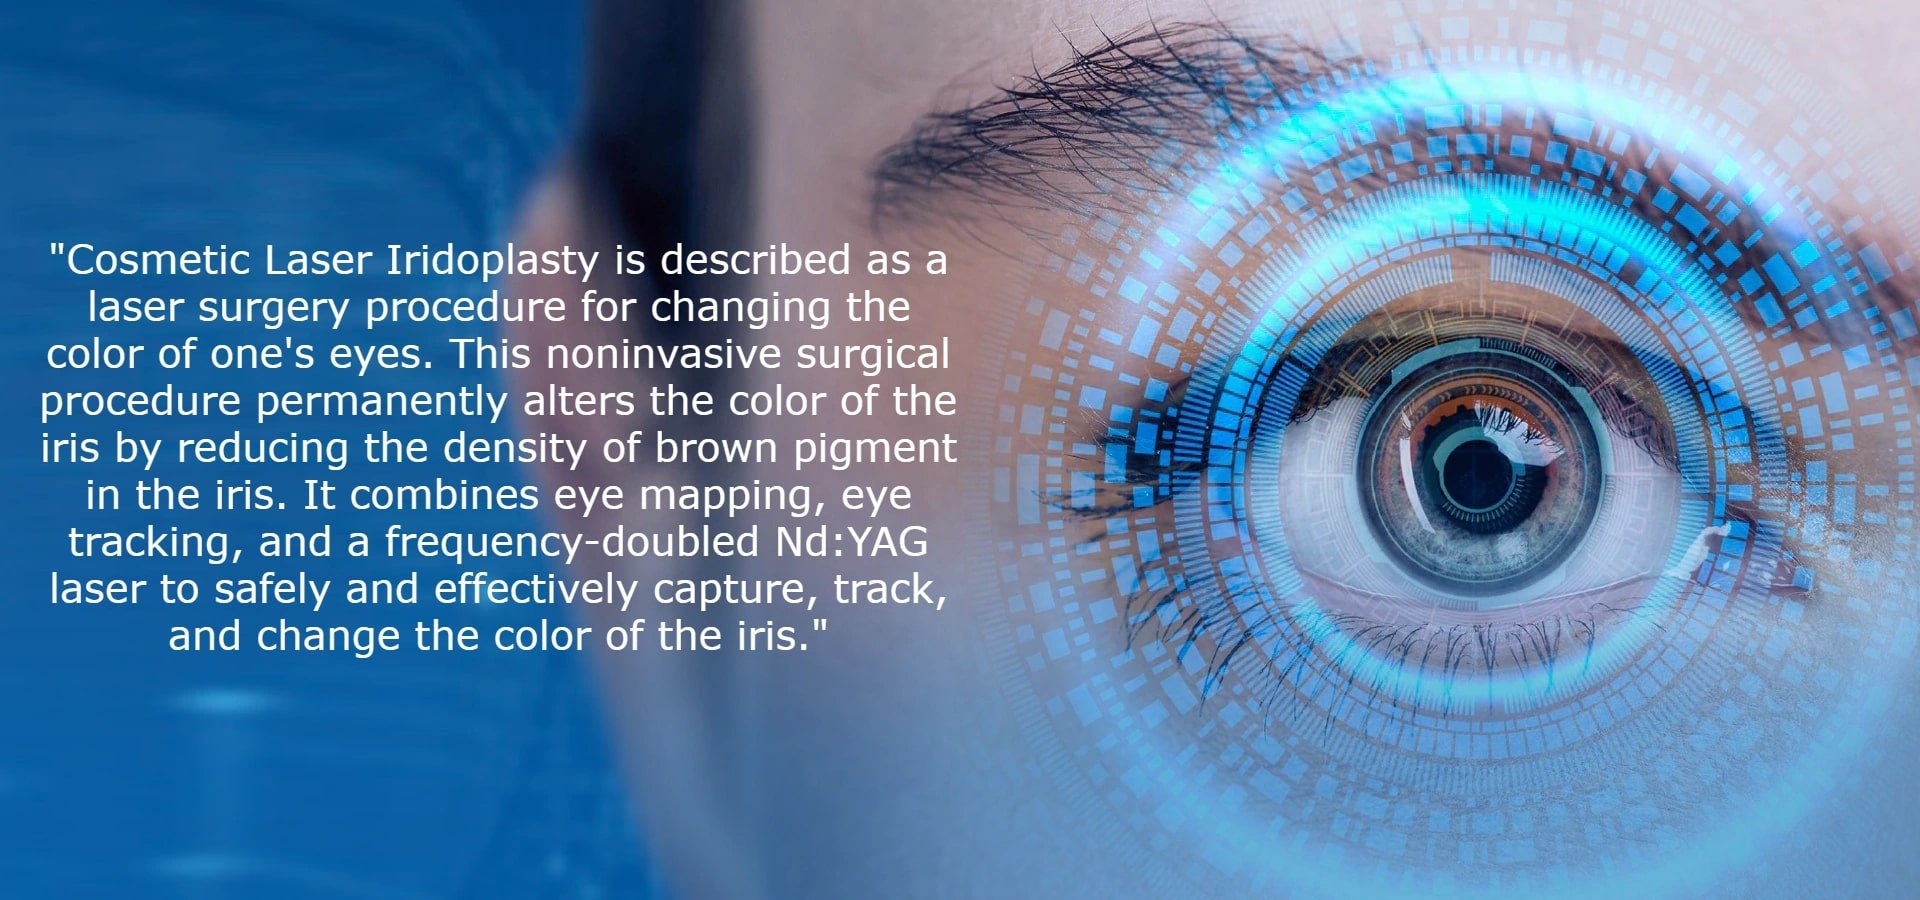
Cosmetic Laser Iridoplasty is described as a laser surgery procedure for changing the color of one's eyes. This noninvasive surgical procedure permanently alters the color of the iris by reducing the density of brown pigment in the iris. It combines eye mapping, eye tracking, and a frequency-doubled Nd:YAG laser to safely and effectively capture, track, and change the color of the iris. Recent experiences with this novel laser treatment have been promising.
"Our Laser Eye Color Change surgery procedures are only performed by experienced ophthalmologists under strictly controlled settings and safe iterations. We use only the best-in-class laser technology to change the color of your eye, providing precise control over the frequency, wavelength, and timing of laser exposure," says an ophthalmologist at B2C Consulting.
How Does It Work?
According to expert studies, melanin, the protective pigment that determines skin and hair shades, is responsible for human eye color. Melanin is good at absorbing light, which is especially important for the iris, which controls how much light enters the eyes. The pigment in the anterior iris determines eye color. The color of the iris is made up of three components: hue, saturation, and value. Hue refers to the combination of primary colors (in this case, the underlying green or blue in the eye), saturation refers to the color's distance from white on a spectrum, and value refers to the brightness or light reflectance.
One of the distinguishing characteristics of the Cosmetic Laser Iridoplasty procedure performed by the experts at B2C Consulting Istanbul is that it can produce a range of color appearances,
ranging from light to dark blue, by removing varying amounts of iris pigmentation.
"There are two types of pigment: eumelanin, which produces a rich chocolate brown, and pheomelanin, which produces amber, green, and hazel. Blue eyes, on the other hand, get their color from a small amount of eumelanin. When the pigment is depleted, it scatters light around the front layer of the iris, causing it to reappear in shorter blue wavelengths," they add.
According to the experts at B2C Consulting, during the procedure, a frequency-doubled Nd:YAG laser (532-nm wavelength) is used to raise and lower the temperature of the anterior iris pigment 15 times in 30 seconds. The laser treatment causes photo thermolysis, which stimulates the anterior iris pigment, and cytokine and macrophage responses resulting in pigment removal through the vasculature, revealing the underlying gray stromal fibers of the iris.
Conclusion
Turkey is widely recognized as the global capital for laser eye color change surgery, with B2C Consulting being the leading provider. They provide the ideal balance of quality and convenience. Not all medical centers that offer cosmetic laser iridoplasty are the same, but the best ones make the entire process painless, safe, and highly effective.
Laser eye color change surgery consists of 8 laser applications spread out over 8 days, including an optical examination prior to surgery. The procedure consists of one how to change eye color to blue 10-minute laser application per day, and it will take three weeks for the treatment to take effect.
To learn more about Laser Eye Color Change Surgery, visit their website, www.laser-iridoplasty.com, and schedule a consultation with a professional ophthalmologist.
Media Contact
Company Name: B2C Consulting | Laser Eye Color Change - Laser Iridoplasty
Email:Send Email
Country: Turkey
Website:https://www.lasereyecolorchangeistanbul.com/
Not known Factual Statements About custom iron on vinyl letters
Vinyl lettering has become increasingly popular in recent years, thanks to its versatility and affordability. Whether you're looking to add a personal touch to your car, create custom signage for your business, or decorate your home, vinyl lettering offers endless possibilities. In this guide, we'll walk you through the process of creating and applying custom vinyl lettering, step by step. So let's dive in and explore the world of custom vinyl lettering!
Understanding Vinyl Lettering
Vinyl lettering is a form of adhesive signage made from a thin, self-adhesive vinyl material. It typically comes in rolls or sheets and can be cut into various shapes and sizes using a vinyl cutter or plotter. The lettering is usually pre-spaced and ready to be applied to a wide range of surfaces, including walls, windows, vehicles, and more. Vinyl lettering is available in a multitude of colors, finishes, and fonts, allowing you to create a truly personalized look.
Gathering the Necessary Materials
Before you begin creating your custom vinyl lettering, make sure you have the following materials:
Vinyl sheets or rolls in the desired color(s)
A vinyl cutter or plotter
Transfer tape or application tape
Scissors or a cutting tool
A squeegee or credit card for application
Cleaning supplies (e.g., rubbing alcohol and a lint-free cloth)
Designing Your Lettering
The first step in creating custom vinyl lettering is designing the layout and text. You can use graphic design software or online tools to create your design. Consider the size, font, and color of the lettering to ensure it suits your intended application. Remember to keep the design simple and legible, especially if it will be viewed from a distance. Once your design is ready, save it in a compatible file format for your vinyl cutter or plotter.
Preparing the Vinyl
Using your vinyl cutter or plotter, load the vinyl sheet or roll and set the appropriate cutting settings according to the manufacturer's instructions. Ensure the blade is sharp for clean and precise cuts. Once the cutting settings are configured, send the design file to the machine and wait for it to complete the cutting process. Afterward, carefully remove the excess vinyl from around the letters using scissors or a cutting tool.
Applying Transfer Tape
To facilitate the application of vinyl lettering, transfer tape or application tape is used. Cut a piece of transfer tape slightly larger than your design. Peel the backing paper from the transfer tape and align it with the top edge of the vinyl lettering. Slowly lay the tape down, smoothing it with a squeegee or credit card as you go to remove any air bubbles or wrinkles.
Preparing the Surface
Before applying the vinyl lettering, ensure the surface is clean and free of dust, dirt, or oils. Wipe the area with rubbing alcohol and a lint-free cloth to remove any contaminants that may affect adhesion. Allow the surface to dry completely before proceeding.
Applying the Vinyl Lettering
With the transfer tape and vinyl lettering ready, position the design on the desired surface. Use a measuring tool or level to ensure proper alignment and spacing. Once positioned correctly, press the transfer tape onto the surface, starting from the top and working your way down. Use a squeegee or credit card to firmly press the vinyl onto the surface, ensuring good adhesion. Carefully peel off the transfer tape, starting from one corner and pulling it back at a 45-degree angle.
Finishing Touches
After applying the vinyl lettering, inspect it for any bubbles or imperfections. If you notice any, gently lift the affected area and smooth it out with a squeegee or credit card, applying pressure from the center to the edges. Take your time to ensure a smooth and bubble-free application.
Caring for Vinyl Lettering
Proper maintenance is crucial to ensure the longevity of your vinyl lettering. Avoid using abrasive cleaners or scrubbing the area where the lettering is applied, as this can damage the vinyl. Instead, clean the surface gently with a mild soap and water solution, using a soft cloth or sponge. Avoid using excessive force or scraping tools that could peel or lift the vinyl. Regularly inspect the lettering for any signs of wear or lifting, and address them promptly to maintain the appearance and durability of your vinyl lettering.
Removing Vinyl Lettering
If you ever need to remove the vinyl lettering, there are a few methods you can use. One common technique is to heat the lettering with a hairdryer or heat gun, which softens the adhesive and makes it easier to peel off. Start at one corner and slowly peel the vinyl, applying heat as needed. Alternatively, you can use a vinyl removal solvent or adhesive remover, following the manufacturer's instructions. Remember to be patient and work slowly to avoid damaging the underlying surface.
Additional Tips and Considerations
When choosing a font for your vinyl lettering, opt for bold and legible styles, especially for small sizes or long distances.
Test the vinyl and transfer tape on a small, inconspicuous area before applying it to the final surface to ensure compatibility and adhesion.
If you're applying vinyl lettering to a curved surface, use small relief cuts in the vinyl to allow it to conform smoothly.
Take measurements and use masking tape as a guide to ensure straight and even placement of the lettering.
Consider the contrast between the vinyl lettering and the background surface to ensure maximum visibility.
If you're new to working with vinyl lettering, practice on vinyl lettering custom a spare piece of vinyl or a less visible surface before applying it to your desired location.
In conclusion, custom vinyl lettering provides a fantastic opportunity to personalize your space, promote your business, or add a touch of creativity to your projects. By following the steps outlined in this guide and taking the time to carefully design, cut, and apply the vinyl lettering, you can achieve professional-looking results. Remember to exercise patience, attention to detail, and proper care to ensure the longevity and visual appeal of your custom vinyl lettering. So, unleash your creativity and start exploring the endless possibilities of custom vinyl lettering today!

Article Under Review
Article Under Review